How to Set Up Residential Proxies in GoLogin (with Screenshots)
Published: 17 July 2026 · Tested on GoLogin 4.3.10 (macOS) · Every step shown on a real profile
TL;DR: GoLogin gives each profile a distinct fingerprint; a residential proxy gives it a distinct, trustworthy IP. On the profile's Proxy tab choose Your proxy, enter gw.roamproxy.com port 41080, set Login to your Roam username + -country-us, add your password, create the profile, and GoLogin confirms the connection. Run it and verify a real ISP exit.
GoLogin is a popular antidetect browser for running many accounts, each in its own Orbita profile with a unique fingerprint. The fingerprint only holds up if the profile also exits from a believable IP — a real residential connection, not the datacenter your machine sits on. Here's how to point a GoLogin profile at a Roam residential exit, with no add-on required.
Step 1 — Get your Roam credentials
Sign up at roamproxy.com (300MB free, no card) and grab three things from the dashboard: your proxy username, your proxy password, and the gateway gw.roamproxy.com:41080. Append -country-<cc> to the username to choose the exit country, and -session-<id> to keep the same IP across launches.
Step 2 — Add the proxy to a profile
Click Add profile, give it a name (we used "Roam Residential US"), and open the Proxy tab. Select Your proxy, then fill in the connection:
- Connection type: HTTP (Auto also works — GoLogin detects it)
- Host / Port:
gw.roamproxy.com/41080 - Login: your Roam username +
-country-us(add-session-<id>for a sticky IP) - Password: your Roam proxy password
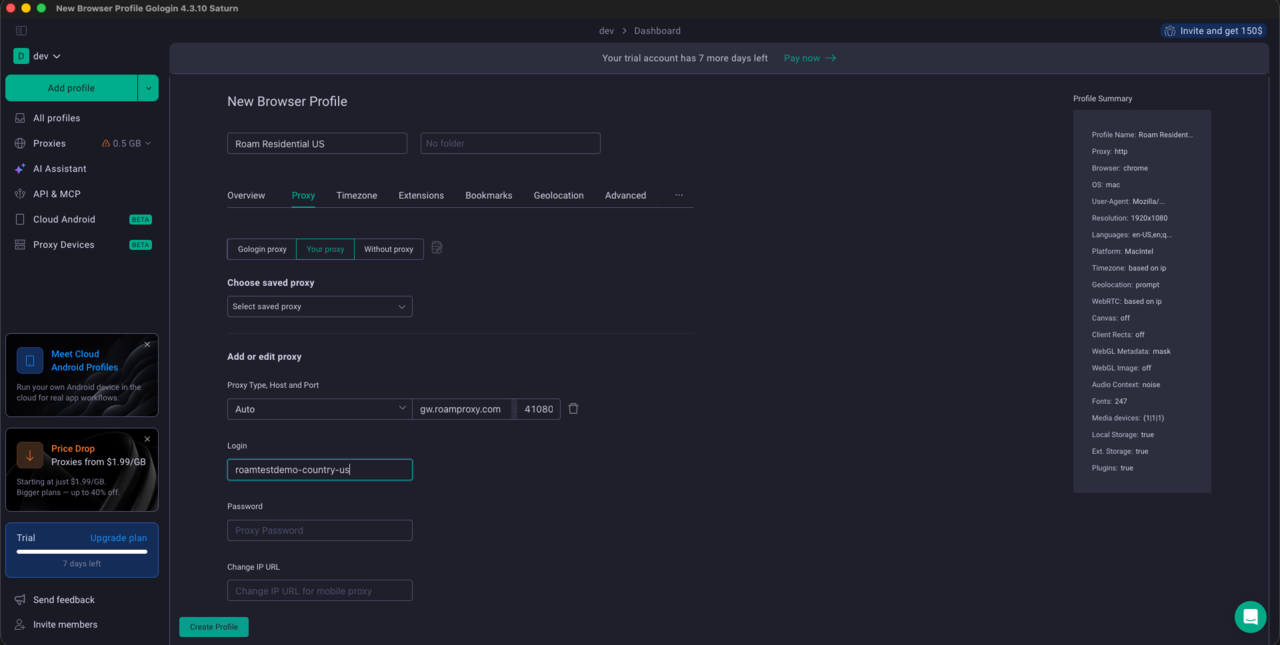
gw.roamproxy.com:41080, Login pinned to -country-us.Step 3 — Create the profile and confirm the connection
Click Create Profile. GoLogin tests the proxy immediately and, on success, shows the profile as Connected with the exit city and country. Our demo exit came up as New York City, United States — the proxy is live before the browser even opens.
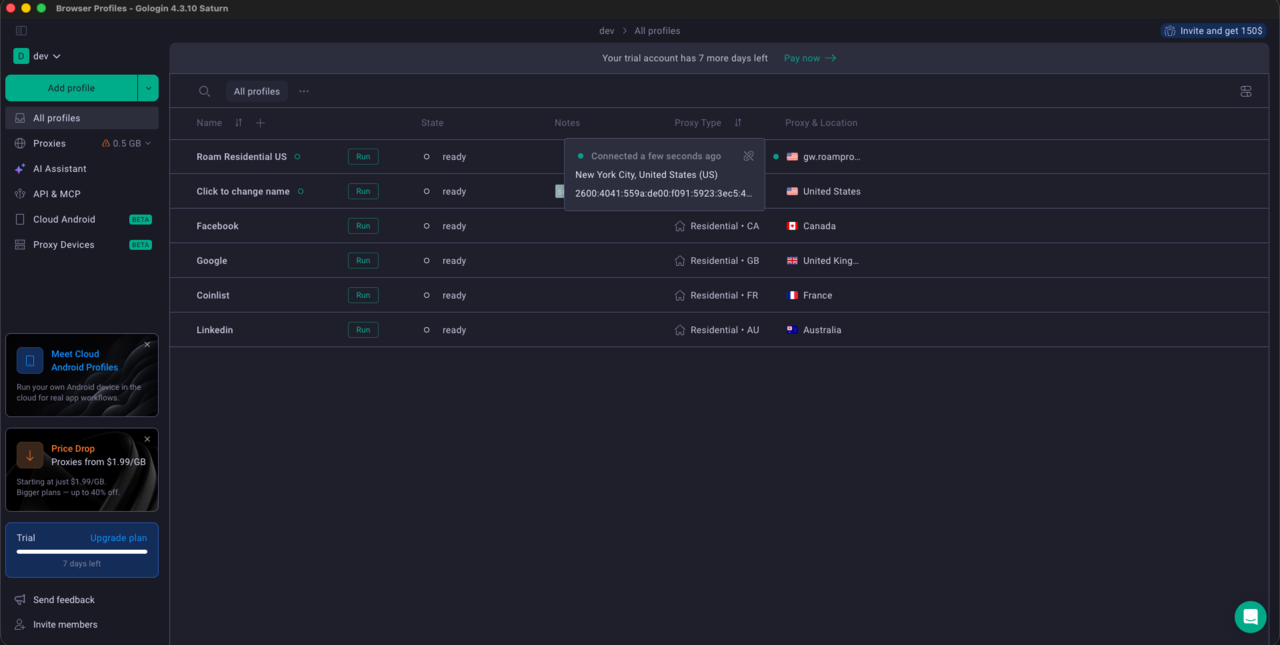
Step 4 — Run and verify the exit
Click Run to launch the Orbita browser for that profile, then open an IP checker such as browserleaks.com/ip. Confirm the exit is a real ISP in your chosen country — not your hosting provider. In our run the exit resolved to a genuine US consumer telephone company in Kansas: a real last-mile connection, exactly what an antidetect profile needs.
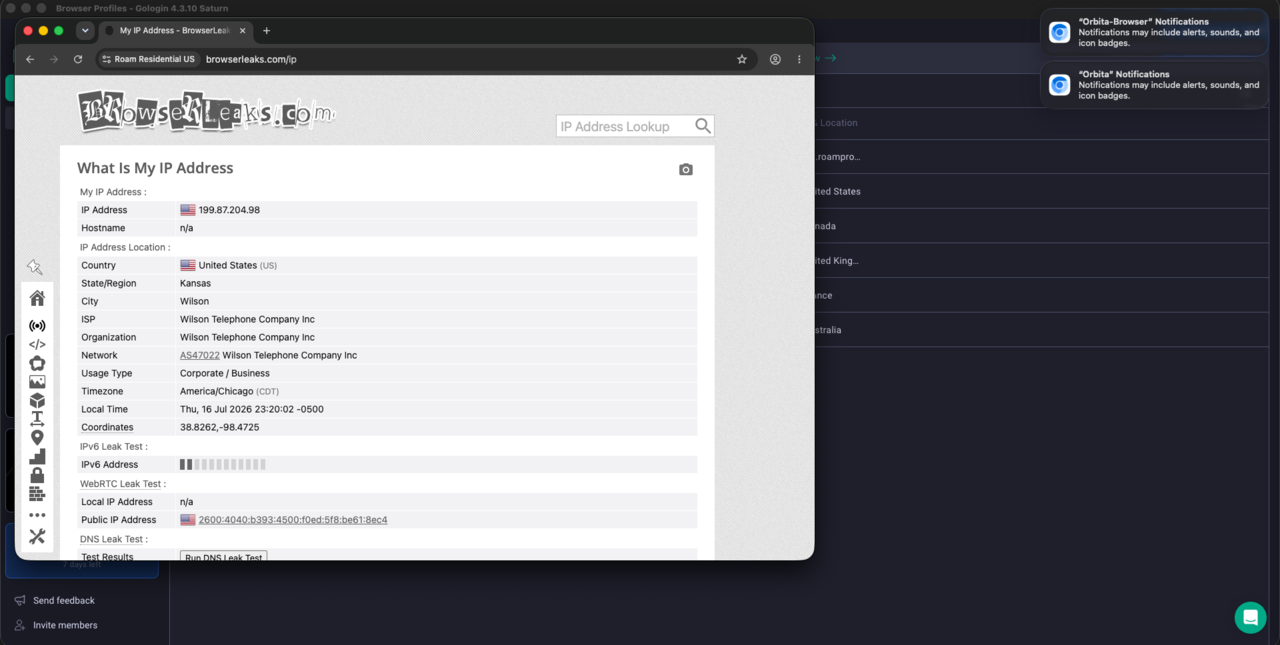
Rotate or keep the IP
Stickiness is controlled by the -session-<id> token in the Login field. Keep the token identical and the profile reuses the same residential IP every run — the right setup for accounts you sign into repeatedly. Change it for a fresh IP. For accounts you hold for months, a dedicated static residential IP ($4/IP/month) is more stable still. Keep one profile mapped to one exit; never share an IP across two GoLogin profiles.
FAQ
Which proxy mode should I use in GoLogin for Roam?
Choose Your proxy and set connection type HTTP (Auto works too). Host gw.roamproxy.com, Port 41080, Login = your Roam username + -country-<cc>, Password = your Roam proxy password.
How do I give each GoLogin profile its own IP?
Use a different -session-<id> token per profile in the Login field. Each token maps to its own sticky residential IP, so profiles never share an exit. For long-lived accounts, assign a dedicated static residential IP instead.
Can I test GoLogin + Roam for free?
Yes. Roam gives a 300MB residential free trial with no card required — enough to create a profile, connect the proxy, and confirm your residential exit IP before paying. After that it's $2/GB metered, no subscription.
Does Roam integrate with GoLogin directly?
No add-on needed — Roam works as a standard HTTP proxy under "Your proxy". Paste the credentials and GoLogin handles the rest. For bulk profiles you can script it via GoLogin's API; email support@roamproxy.com for help.
Give every GoLogin profile a real residential exit: start with 300MB free — no card, then $2/GB metered with no subscription. Related: AdsPower proxy setup · Kameleo proxy setup · proxies for antidetect browsers. Hitting an error instead? Fix a proxy that will not connect.